Boil Cloud最近推出的这台“「包羅萬有」All In One HK NAT”,应该算是最近玩到的最有趣的VPS了。要说这种形式,并不新鲜,之前也有一些商家,推出过国内三线自助切换出口的VPS,例如OLVPS,但有实力能融合如此之多的家宽落地,又将价格带到这么一个堪称良心的价位的,确实仅此一家。玩了两天,记录一下使用过程中,和大家分享一下。
一、机器配置
4 cores 4096 MB 8 GB 1 TB 流量Bandwidth「工單重置」
网络:
入: 香港HKBN NAT 100 ports 1000Mbps 动态家宽 提供DDNS
出(自助更换,5️⃣机共享):
- 香港HKBN动态家宽(直出)
- 温哥华Telus动态家宽
- 台中HiNet动态家宽(一天一变)
- 香港HKT动态家宽(一天一变)
- 日本So-Net静态商宽
- 香港CMHK动态家宽
- 西雅图StarLink动态星链(未启用)
- 韩国SK动态家宽
- 香港Smartone 5G移动数据 【更多正在部署】
二、流媒体解锁情况

家宽落地,最大的需求,自然是流媒体解锁了,我这边搭建了各个出口各自的流媒体解锁情况实时监控:
https://detect.media/public-dashboards/4fb777238eca480ab136350797ff737c
除了StarLink暂时还没开通,其他8个出口都拥有不俗的流媒体解锁能力。
三、端内延迟
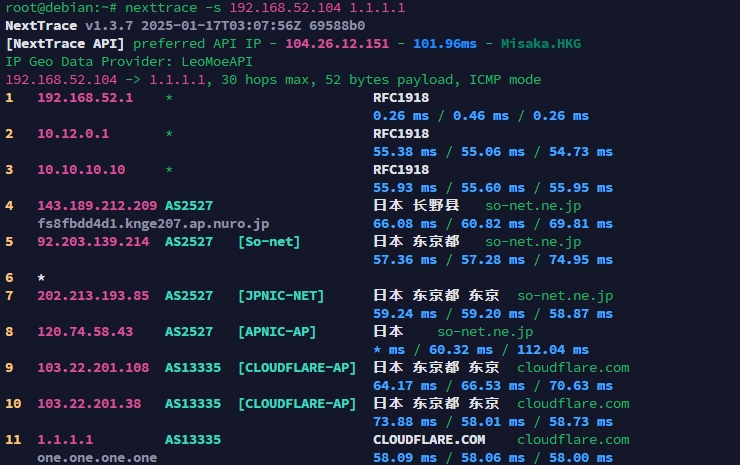
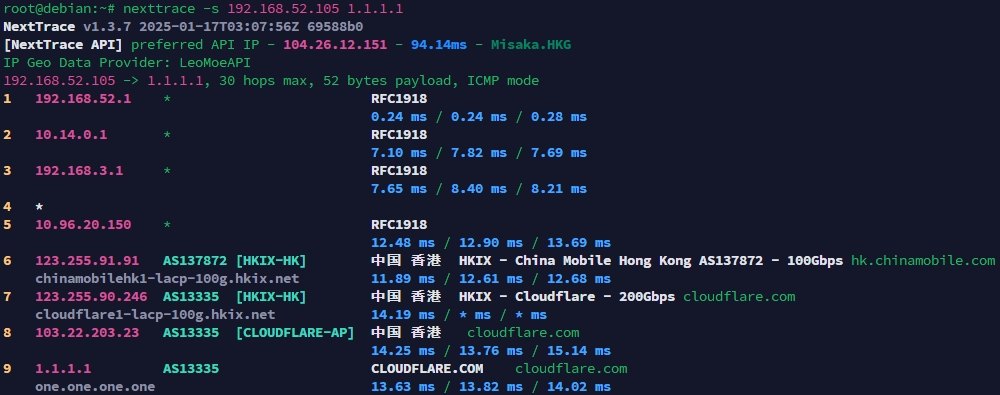
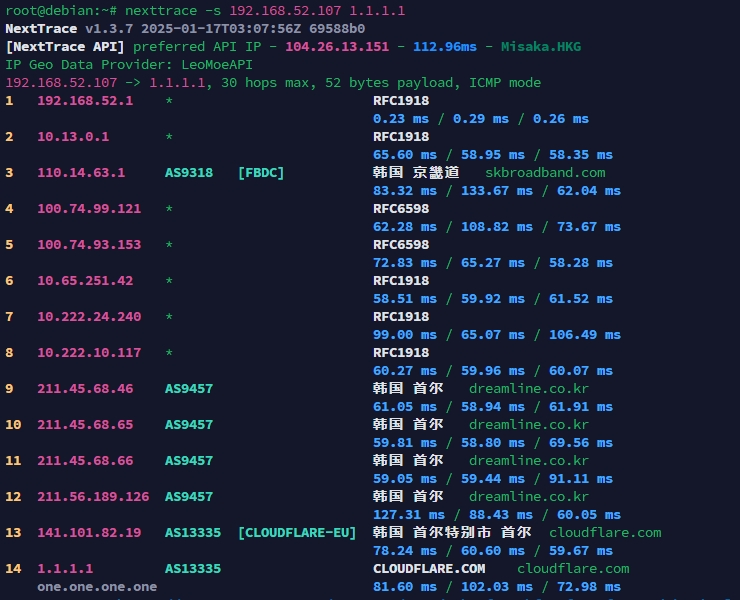
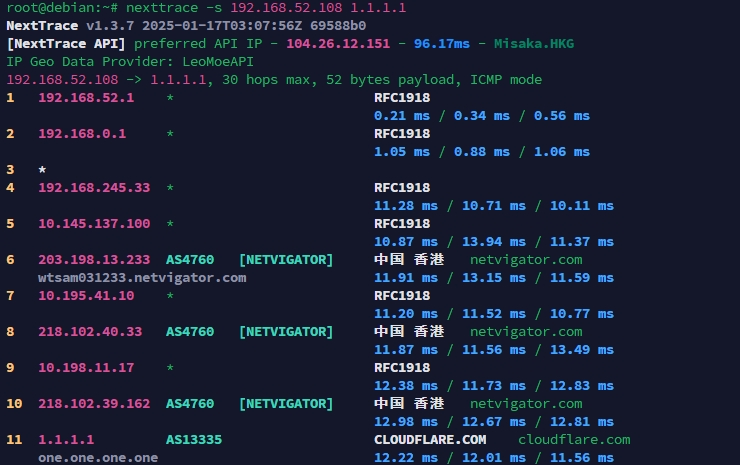
出口中,仅有HKBN可作为入口,其他出口,均需通过内网路由,也就是说,延迟是“本地-HKBN-出口”,具体我也分别进行了一下测试。
HKBN
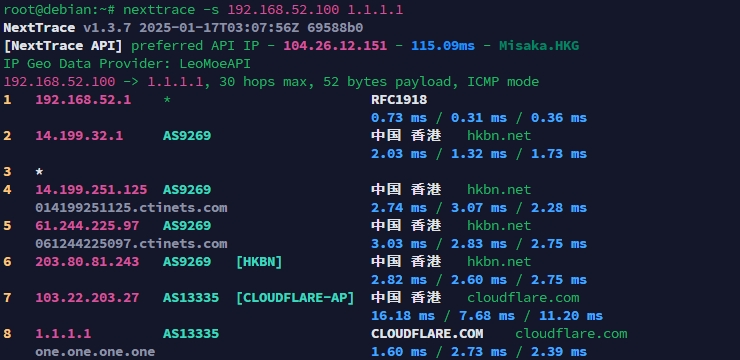
Telus
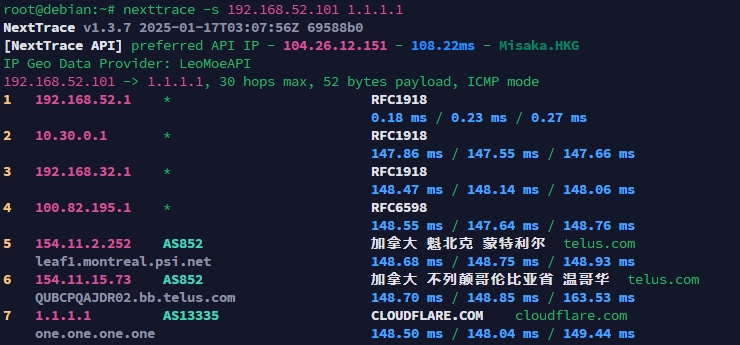
Hinet
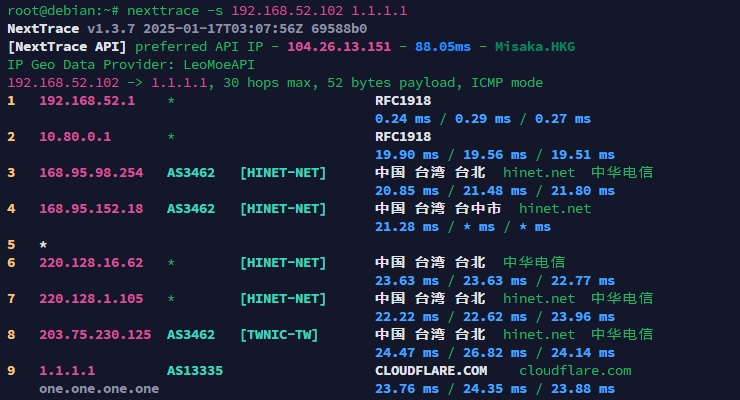
HKT
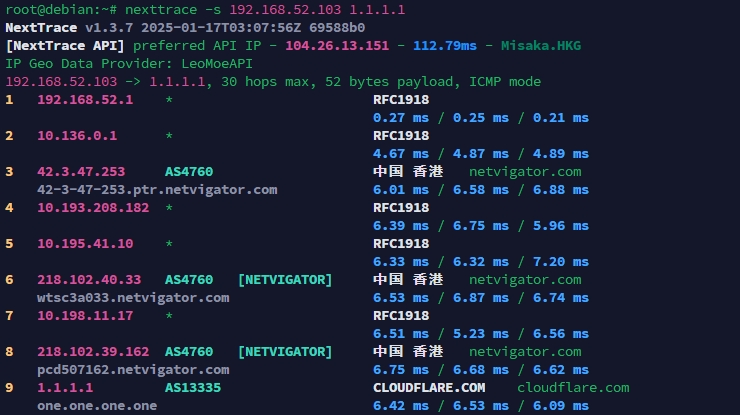
Sony
CMHK Broadband
SK Broadband
CMHK 5G
四、搭建代理节点并使用不同出口
以下内容部分参考了:
《3x-ui使用多个IP不同出入口 - 多端口配置方案》
https://www.vircs.com/index.php/blogs/23
不同点在于,由于出口IP并不能作为入口直通,因此添加节点时,不需要配置监听IP,或者仍旧填写HKBN入口的内网IP即可。
以下代码需根据实际替换xx内容,且只举了两个出口例子,其他自行增加即可,出站规则为:
[
  {
    "tag": "hkbn",
    "sendThrough": "192.168.xx.xx0",
    "protocol": "freedom",
    "settings": {}
  },
  {
    "tag": "telus",
    "sendThrough": "192.168.xx.xx1",
    "protocol": "freedom",
    "settings": {}
  },
  {
    "tag": "direct",
    "protocol": "freedom",
    "settings": {
      "domainStrategy": "UseIP",
      "redirect": "",
      "noises": []
    }
  },
  {
    "tag": "blocked",
    "protocol": "blackhole",
    "settings": {}
  }
]
以下代码需根据实际替换xx内容,且只举了两个出口例子,其他自行增加即可,路由规则为:
[
  {
    "inboundTag": [
      "inbound-192.168.xx.xx0:xxxx0"
    ],
    "outboundTag": "hkbn",
    "type": "field"
  },
  {
    "inboundTag": [
      "inbound-192.168.xx.xx0:xxxx1"
    ],
    "outboundTag": "telus",
    "type": "field"
  },
  {
    "type": "field",
    "inboundTag": [
      "api"
    ],
    "outboundTag": "api"
  },
  {
    "type": "field",
    "outboundTag": "blocked",
    "ip": [
      "geoip:private"
    ]
  },
  {
    "type": "field",
    "outboundTag": "blocked",
    "protocol": [
      "bittorrent"
    ]
  }
]
五、多出口同时监控流媒体解锁
具体教程可以参考之前的文章:
《Media Unlock Monitor - 对接Prometheus&Grafana实现流媒体解锁监控》
https://yorkchou.com/media-unlock-monitor.html
不同之处在于,原有项目:https://github.com/nkeonkeo/MediaUnlockTest/tree/main/monitor,不支持同过-I参数绑定不同source ip,因此换用衍生项目:https://github.com/HsukqiLee/MediaUnlockTest/tree/main/monitor
创建 systemd 服务文件
使用 nano 或其他编辑器创建一个新的 systemd 单元文件:
sudo nano /etc/systemd/system/unlock-monitor.service
然后添加以下内容:
[Unit]
Description=Unlock Monitor Service
After=network.target

[Service]
Type=simple
User=root
ExecStart=/bin/bash /root/monitor/start-unlock-monitor.sh
Restart=always
RestartSec=5

[Install]
WantedBy=multi-user.target
这里 ExecStart 指向一个启动脚本,我们将在下一步创建它。
创建启动脚本
新建 /root/monitor/start-unlock-monitor.sh:
sudo nano /root/monitor/start-unlock-monitor.sh
然后把你的代码放进去,以下代码需根据实际替换xx内容:
#hkbn
nohup unlock-monitor -listen ":xxxx0" -I 192.168.xx.xx0 -hk >> /root/monitor/output-hkbn.log 2>&1 &
#telus
nohup unlock-monitor -listen ":xxxx1" -I 192.168.xx.xx1 -na >> /root/monitor/output-telus.log 2>&1 &
#hinet
nohup unlock-monitor -listen ":xxxx2" -I 192.168.xx.xx2 -tw >> /root/monitor/output-hinet.log 2>&1 &
#hkt
nohup unlock-monitor -listen ":xxxx3" -I 192.168.xx.xx3 -hk >> /root/monitor/output-hkt.log 2>&1 &
#sony
nohup unlock-monitor -listen ":xxxx4" -I 192.168.xx.xx4 -jp >> /root/monitor/output-sony.log 2>&1 &
#cmhk
nohup unlock-monitor -listen ":xxxx5" -I 192.168.xx.xx5 -hk >> /root/monitor/output-cmhk.log 2>&1 &
#starlink
nohup unlock-monitor -listen ":xxxx6" -I 192.168.xx.xx6 -sa >> /root/monitor/output-starlink.log 2>&1 &
#sk
nohup unlock-monitor -listen ":xxxx7" -I 192.168.xx.xx7 -kr >> /root/monitor/output-sk.log 2>&1 &
#cmhk5g
nohup unlock-monitor -listen ":xxxx8" -I 192.168.xx.xx8 -hk >> /root/monitor/output-cmhk-5g.log 2>&1 &
保存后,赋予执行权限:
sudo chmod +x /root/monitor/start-unlock-monitor.sh
启动并启用服务
运行以下命令启动服务:
sudo systemctl daemon-reload
sudo systemctl start unlock-monitor
sudo systemctl enable unlock-monitor
这样,每次开机时,unlock-monitor 都会自动运行。
六、多出口DDNS
我用的是HE DNS,通过curl的形式自动更新DDNS,因此可以使用curl的--int参数。
以下是通过crontab,实现10分钟一次,更新ddns的例子,按需求一行一条添加另外入口即可。
*/10 * * * * curl --int 192.168.xx.xx0 "https://dyn.dns.he.net/nic/update" -d "hostname=hkbn.xx.xx" -d "password=xxx" -k
七、多出口IP变更TG通知

这个需求纯粹是我的个人需求,就想知道入口的IP是否发生了变化,如有变化,则通过Telegram进行通知,以下是ChatGPT帮我糊的脚本,可以保存后,通过crontab,每10分钟左右执行一次
*/10 * * * * /path/to/ipdetect.sh
以下是ipdetect.sh内容,部分内容需自行替换:
#!/usr/bin/env bash
set -e

# Telegram API 配置
TELEGRAM_API="https://api.telegram.org/bot[你的bot密钥]/sendMessage"
CHAT_ID="[你的chat id]"

# 记录 IP 和 ASN 信息的文件路径
IP_ASN_FILE="/var/tmp/ip_asn_history.txt"

# 监测的 IP 接口和对应标签
declare -A ip_labels=(
    ["192.168.xx.xx0"]="HKBN"
    ["192.168.xx.xx1"]="Telus"
    ["192.168.xx.xx2"]="HiNet"
    ["192.168.xx.xx3"]="HKT"
    ["192.168.xx.xx4"]="Sony"
    ["192.168.xx.xx5"]="CMHK"
    ["192.168.xx.xx6"]="StarLink"
    ["192.168.xx.xx7"]="SK"
    ["192.168.xx.xx8"]="CMHK 5G"
)

# 获取 IP 和 ASN 的函数
get_ip_info() {
    local interface_ip="$1"
    result=$(curl -s --interface "$interface_ip" ipinfo.io)
    ip_address=$(echo "$result" | jq -r '.ip')
    org=$(echo "$result" | jq -r '.org')
    echo "$ip_address|$org"
}

# 读取上次记录的 IP 和 ASN 信息
read_previous_ip_asn() {
    if [ -f "$IP_ASN_FILE" ]; then
        cat "$IP_ASN_FILE"
    else
        echo ""
    fi
}

# 保存当前 IP 和 ASN 信息到文件
save_current_ip_asn() {
    local ip_asn="$1"
    echo "$ip_asn" > "$IP_ASN_FILE"
}

# 发送 Telegram 通知
send_telegram_notification() {
    local label="$1"
    local new_ip="$2"
    local new_asn="$3"
    local old_ip="$4"
    local old_asn="$5"

    message="${label} IP 已变更,新 IP:${new_ip},ASN:${new_asn},旧 IP:${old_ip},ASN:${old_asn}"

    curl -s -X POST "$TELEGRAM_API" \
        -d "chat_id=$CHAT_ID" \
        -d "text=$message"
}

# 监测 IP 和 ASN 的变化并发送通知
check_ip_changes() {
    declare -A previous_data
    declare -A current_data

    # 读取上次的 IP 和 ASN 信息
    previous_ip_asn=$(read_previous_ip_asn)

    # 解析上次的 IP 和 ASN 数据
    while IFS="|" read -r int_ip old_ip old_asn; do
        if [[ -n "$int_ip" && -n "$old_ip" && -n "$old_asn" ]]; then
            previous_data["$int_ip"]="$old_ip|$old_asn"
        fi
    done <<< "$previous_ip_asn"

    # 记录当前 IP 和 ASN 信息
    new_ip_asn_data=""
    for int_ip in "${!ip_labels[@]}"; do
        label="${ip_labels[$int_ip]}"
        current_info=$(get_ip_info "$int_ip")
        current_ip=$(echo "$current_info" | awk -F '|' '{print $1}')
        current_asn=$(echo "$current_info" | awk -F '|' '{print $2}')

        current_data["$int_ip"]="$current_ip|$current_asn"

        # 检查是否发生变化
        if [[ "${previous_data[$int_ip]}" != "$current_ip|$current_asn" ]]; then
            old_ip=$(echo "${previous_data[$int_ip]}" | awk -F '|' '{print $1}')
            old_asn=$(echo "${previous_data[$int_ip]}" | awk -F '|' '{print $2}')
            send_telegram_notification "$label" "$current_ip" "$current_asn" "$old_ip" "$old_asn"
        fi

        # 记录新数据(格式:接口 IP | 公网 IP | ASN)
        new_ip_asn_data+="${int_ip}|${current_ip}|${current_asn}\n"
    done

    # 更新记录文件
    echo -e "$new_ip_asn_data" | sed '/^$/d' > "$IP_ASN_FILE"
}

# 执行检查
check_ip_changes
以上就是玩这台机2天左右时间的记录,希望对大家有帮助,谢谢!


One comment
厉害,感谢分享!